RflySim3D Shortcuts and Console Command Index
Keyboard Shortcut Index
| Shortcut Name | Brief Description |
|---|---|
| [F1] | Pop up the keyboard shortcut help menu |
| [F2] | Export RflySim built-in level and model indices |
| [ESC] | Clear all aircraft |
| [S] | Show/Hide aircraft IDs |
| [H] | Hide/Show all on-screen text |
| [D] | Show/Hide current aircraft data |
| [M] | Switch map |
| [B] | Switch view focus among different aircraft |
| [C] | Switch current aircraft 3D style |
| [P] | Enable physics collision engine |
| [V] | Switch following aircraft view |
| [N] | Switch to god view |
| [T] | Record aircraft trajectory |
| L | Show/Hide mini-map (by default appears in the bottom-right corner; double-clicking on the mini-map reveals more customizable options) |
| [Mouse] | Interaction similar to a game map editor |
| [O] | Create an object at the mouse-clicked location |
Console Command Index
RflySim Custom Global Commands
| Command Name | Brief Description |
|---|---|
| [RflyShowTextTime] | Display text |
| [RflyLoad3DFile] | Execute TXT script |
| [RflySetIDLabel] | Set display at CopterID label |
| [RflySetMsgLabel] | Set display below CopterID label |
| [RflyChangeMapbyID] | Switch map by ID |
| [RflyChangeMapbyName] | Switch map by name |
| [RflyCesiumOriPos] | Modify map origin |
| [RflyCameraPosAngAdd] | Offset camera |
| [RflyCameraPosAng] | Reset camera |
| [RflyCameraFovDegrees] | Set field of view |
| [RflyChange3DModel] | Modify Copter style |
| [RflyChangeVehicleSize] | Adjust Copter size |
| [RflyMoveVehiclePosAng] | Offset Copter |
| [RflySetVehiclePosAng] | Reset Copter |
| [RflySetActuatorPWMs] | Trigger blueprint interface; this feature is available only for Personal Advanced Edition and above |
| [RflySetActuatorPWMsExt] | Trigger extended blueprint interface; this feature is available only for Personal Advanced Edition and above |
| [RflySetCopterLine] | Define the color of the drone trajectory displayed when pressing the [T] key |
| [RflyDelVehicles] | Clear Copter |
| [RflyScanTerrainH] | Scan terrain |
| [RflyReqVehicleData] | Activate data telemetry |
| [RflySetPosScale] | Global scaling |
| [RflyReqObjData] | Specify data telemetry |
| [RflyClearCapture] | Clear image cache |
| [RflyDisableVeMove] | Reject specified Copter data |
| [RflyChangeViewKeyCmd] | Simulate keyboard shortcuts |
| [RflyEnImgSync] | Switch image transmission mode |
| [RflyGetBuildingInfo] | Retrieve all object information in the scene |
Common Built-in UE Commands
| Command Name | Brief Description |
|---|---|
| [t.Maxfps] | Limit frame rate |
| [slomo ] | Modify running speed |
| [HighResShot] | Custom-size screenshot |
| [stat fps] | Display update rate |
| [stat unit] | Display various consumption metrics |
| [stat rhi] | Display GPU consumption details |
| [stat game] | Display Tick feedback time for each process |
| [stat gpu] | Display frame GPU statistics |
| [stat Engine] | Display frame rate, time, triangle count, etc. |
| [stat scenerendering] | Display DrawCall count |
| [r.setRes] | Set display resolution |
| [r.Streaming.PoolSize] | Set texture streaming pool size |
| [r.ForceLOD] | LOD triangle count |
| [r.ScreenPercentage] | Rendering resolution percentage |
| [r.ShadowQuality] | Shadow quality |
| [r.PostProcessAAQuality] | Anti-aliasing quality |
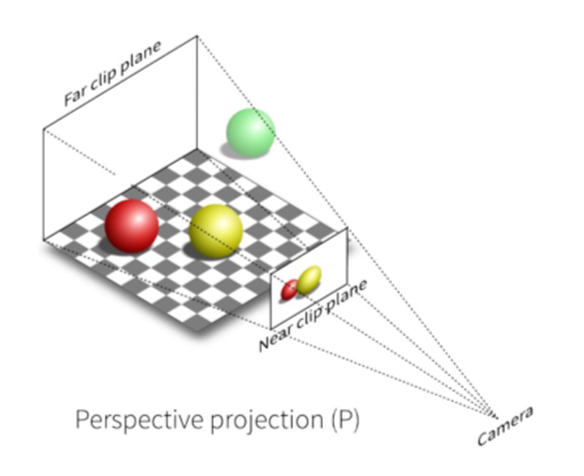
| [r.SetNearClipPlane] | View frustum near clipping plane |
| [r.MipMapLODBias] | Texture LOD bias |
| [sg.TextureQuality] | Texture quality |
| [sg.PostProcessQuality] | Post-processing quality |
| [foliage.MaxTrianglesToRender] | Maximum triangle count for vegetation model rendering |
Shortcut Key Details
Shortcut Key B
B (Toggle focus among Copters):
Switch the view focus among different aircraft;
B+Number (Focus on the -th Copter):
Switch focus to the *-th aircraft.
Shortcut Key C
C (Toggle current Copter’s 3D style):
Toggle the 3D style of the current aircraft (i.e., the most recently created one);
C+Number (Switch to the -th 3D style):
Switch to the *-th 3D style;
CTRL + C (Toggle all Copters’ 3D styles):
Toggle the 3D styles of all aircraft.
Shortcut Key D
D (Toggle Copter data visibility):
Show/hide data for the current aircraft.
Shortcut Key ESC
ESC (Clear all Copters):
Clear all aircraft (first close all CopterSim instances).
Shortcut Key F1
F1 (Help):
Display a help menu listing supported shortcut keys and tips for RflySim3D.
Shortcut Key F2
F2 (3D resource index):
Export the index table of existing scenes and models in RflySim3D to the directory 【Installation Directory】/RflySimAPIs/RflySim3D, saving them as MapData.csv and ModelData.csv, respectively. These files include scene and model names, serial numbers, etc.
Shortcut Key H
H (Toggle all on-screen text):
Hide/show all on-screen text.
Shortcut Key I
I+Number (Toggle LAN blocking status; this feature is available only in the full version and above):
- I-1 mode (pressing I+-1, or simply I by default): Toggle the current LAN blocking status. If the LAN is currently unblocked, both commands will block it; if blocked, they will unblock it.
- I0 mode: Enable LAN blocking. After executing this command, all RflySim3D instances on the local network will stop receiving or sending data.
- I1 mode: Disable LAN blocking. After executing this command, RflySim3D instances on the local network resume normal communication.
Shortcut Key M
M (Switch map):
Switch map (if CopterSim is active, it will revert to CopterSim’s default map);
M+Number (Switch to the -th map):
Switch to the *-th map.
Shortcut Key MOUSE
Left-click and drag (adjust view angle):
Adjust the viewing angle;
Right-click and drag (adjust vertical view position):
Adjust the vertical (YZ) position of the view;
Mouse wheel (adjust horizontal view position):
Adjust the horizontal (X) position of the view;
CTRL + mouse wheel (scale all Copters):
Scale the size of all aircraft (useful for observing multiple aircraft);
ALT + mouse wheel (scale current view aircraft):
Scale the size of the aircraft currently in view;
Mouse double-click (display hit point information):
Display information about the hit point, including its position, size, and object type. Note: Immediately pressing N after double-clicking quickly switches the view to the double-click location, facilitating object creation.
Shortcut Key N
N (Toggle god view):
Switch to the aircraft’s god view;
N+Number (Switch to the -th god view):
Switch to the *-th god view.
- 0: Follow aircraft view (view angle does not change with aircraft attitude);
- 1: Fixed ground view always facing the current aircraft;
- 2: Fixed ground view facing north;
- 3: Fixed ground view facing south; etc.
Shortcut Key O
O+Number (Generate object with ClassID = “”):
Generate an object (e.g., obstacle) with style ID “*” at the location of the mouse double-click.
Shortcut Key P
P (Activate collision engine):
Enable the physics collision engine (collisions will occur with scene objects and the ground);
P+Number (Switch communication mode):
After enabling P mode, RflySim3D will rapidly transmit obstacle information to each CopterSim via the 30100-series ports. Values 0, 1, 2, and 3 correspond to the following communication modes:
- P0 mode (pressing P+0, or simply P by default): RflySim3D sends high-frequency environmental distance data for each aircraft to all CopterSim instances running on the local computer (no LAN transmission).
- P1 mode: LAN transmission mode.
- P2 mode: Minimal LAN transmission mode (only sends data upon collision).
- P3 mode: (Details not provided in original text.)
l In P1 mode, RflySim3D high-frequency transmits distance data around each aircraft to all CopterSim instances within the local area network (via specified IP and port to enhance efficiency).
l In P2 mode, RflySim3D only low-frequency transmits obstacle data to Copt
| Parameter | Explanation |
|---|---|
| HighResShot | Screenshot resolution value: specifies the width and height of the screenshot, typically in pixels. |
Usage Example
HighResShot 1920x1080
This captures a screenshot with a width of 1920 pixels and a height of 1080 pixels, saving it in the specified resolution.
RflyCameraFovDegrees
RflyCameraFovDegrees(float degrees) (Set Field of View)
Sets the camera’s field of view (FOV) angle.
| Parameter | Explanation |
|---|---|
| degrees | FOV angle in degrees |
This function modifies the horizontal field of view angle—the angle formed between the midpoint of the leftmost edge and the midpoint of the rightmost edge of the image plane relative to the camera position. By default, this angle is set to 90°.
Usage Example
RflyCameraFovDegrees 120
Changes the FOV angle to 120°.
RflyCameraPosAng
RflyCameraPosAng(float x, float y, float z, float roll, float pitch, float yaw) (Reset Camera)
Directly sets the camera’s position and orientation.
| Parameter | Explanation |
|---|---|
| x | X-axis position of the camera in world coordinates |
| y | Y-axis position of the camera in world coordinates |
| z | Z-axis position of the camera in world coordinates |
| roll | Camera rotation angle around the X-axis (roll) |
| pitch | Camera rotation angle around the Y-axis (pitch) |
| yaw | Camera rotation angle around the Z-axis (yaw) |
Usage Example
RflyCameraPosAng 0 0 1000 0 0 0
Positions the camera at 1000 units above the origin of the world coordinate system, with default forward-facing orientation.
RflyCameraPosAngAdd
RflyCameraPosAngAdd(float x, float y, float z, float roll, float pitch, float yaw) (Offset Camera)
Applies an offset to the current camera position and orientation.
| Parameter | Explanation |
|---|---|
| x | Offset along the X-axis |
| y | Offset along the Y-axis |
| z | Offset along the Z-axis |
| roll | Offset rotation angle around the X-axis (roll) |
| pitch | Offset rotation angle around the Y-axis (pitch) |
| yaw | Offset rotation angle around the Z-axis (yaw) |
Usage Example
RflyCameraPosAngAdd 0 0 -10 0 -30 0
Moves the camera upward by 10 meters and tilts it downward by 30 degrees.
RflyCesiumOriPos
RflyCesiumOriPos(double lat, double lon, double Alt, double SolarTime) (Modify Map Origin)
Modifies the origin of the Cesium global map (requires Cesium large-scale scene support), allowing specification of the map origin’s latitude, longitude, altitude, and solar time.
| Parameter | Explanation |
|---|---|
| lat | Latitude of the map origin |
| lon | Longitude of the map origin |
| Alt | Altitude (elevation) of the map origin |
| SolarTime | Solar time at the map origin |
Usage Example
RflyCesiumOriPos 39.9042 116.4074 50 12
Sets the map origin to the geographic coordinates of Beijing.
Note
Before using this command, ensure you are in a map scene using the Cesium plugin and preferably connected to the internet to load online map imagery.
Valid latitude range: [-90, 90]; valid longitude range: [-180, 180]. Ensure input coordinates are within these bounds.
RflyChange3DModel
RflyChange3DModel(int CopterID, int veTypes=0) (Change Copter 3D Model)
Changes the 3D model style of a specified drone (Copter).
| Parameter | Explanation |
|---|---|
| CopterID | The ID of the drone, used to specify which drone’s properties are to be modified. |
| veTypes | The style number of the 3D model. This parameter is optional, with a default value of 0. Different numbers can be specified to correspond to different model styles. |
Usage Example
For instance, if the drone’s ID is 1000 and you want to change its style to style #1, you can use the command:
RflyChange3DModel 1000 1
RflyChangeMapbyID
RflyChangeMapbyID(int id) (Switch Map by ID)
Switches the RflySim3D scene map based on the map’s ID.
| Parameter | Explanation |
|---|---|
| id | Map ID |
Usage Example
RflyChangeMapbyID 5
Quickly switch to map #5.
RflyChangeMapbyName
RflyChangeMapbyName(String txt) (Switch Map by Name)
Switches the RflySim3D scene map based on the map name.
| Parameter | Explanation |
|---|---|
| name | Map name |
Usage Example
RflyChangeMapbyName 3Ddisplay
Switch to the map named “3Ddisplay”.
RflyChangeVehicleSize
RflyChangeVehicleSize(int CopterID, float size=0) (Adjust Drone Size)
Modifies the scaling size of a drone.
| Parameter | Explanation |
|---|---|
| CopterID | The ID of the drone, used to specify which drone’s size is to be modified. |
| size | The scaling factor. This parameter is optional, with a default value of 0, indicating no scaling. Specify a positive factor greater than 1 to scale the drone up, or a factor less than 1 to scale it down. |
Usage Example
Suppose you want to increase the size of the drone with ID 1000 to 10 times its original size:
RflyChangeVehicleSize(1000, 10)
RflyChangeViewKeyCmd
RflyChangeViewKeyCmd(String key, int num) (Simulate Keyboard Shortcut)
Simulates pressing a keyboard shortcut followed by entering a number.
| Parameter | Explanation |
|---|---|
| key | Keyboard shortcut key |
| num | Number to input |
Usage Example
For example, pressing the shortcut key “M” followed by a number switches to the map with the corresponding ID. To switch to map #5, use the command:
RflyChangeViewKeyCmd M 5
RflyClearCapture
RflyClearCapture(int seqID) (Clear Image Buffer)
This function clears the image memory captured by the image sensor with the specified seqID. If seqID < 0, it clears the image memory of all cameras.
| Parameter | Explanation |
|---|---|
| seqID | Camera index |
Usage Example
RflyClearCapture -1
RflyDelVehicles
RflyDelVehicles(FString CopterIDList) (Delete Drones)
This function deletes drones currently present in the scene based on their IDs. RflySim3D does not automatically remove drones from the scene—even if data for them is no longer received (which is why drones remain visible in the scene after CopterSim is closed). Explicit commands must be issued to request RflySim3D to remove them.
| Parameter | Explanation |
|---|---|
| CopterIDList | A FString-type parameter specifying a list of drone IDs to be deleted. Multiple IDs must be separated by commas. |
Usage Example
Suppose two drones exist in the scene with IDs 1000 and 1001. To delete both, use the command:
RflyDelVehicles("1000,1001")
Note
Before deleting drones, ensure that data transmission for these drones to RflySim3D has been stopped to prevent them from being recreated unexpectedly.
RflyDisableVeMove
RflyDisableVeMove(FString CopterIDList, int disable) (Reject Data for Specified Drones)
This function instructs RflySim3D to reject data for specified drones by ID, effectively preventing the creation, movement, and attitude changes of drones with those IDs.
| Parameter | Explanation |
|---|---|
| CopterIDList | A comma-separated list of drone IDs whose data reception is to be disabled. |
| disable | Disable flag: controls whether to disable data reception for the specified IDs. Set to 1 to disable, and 0 to re-enable. |
**Usage
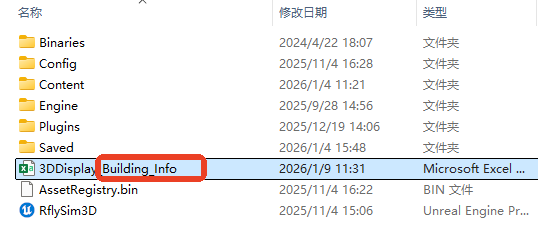
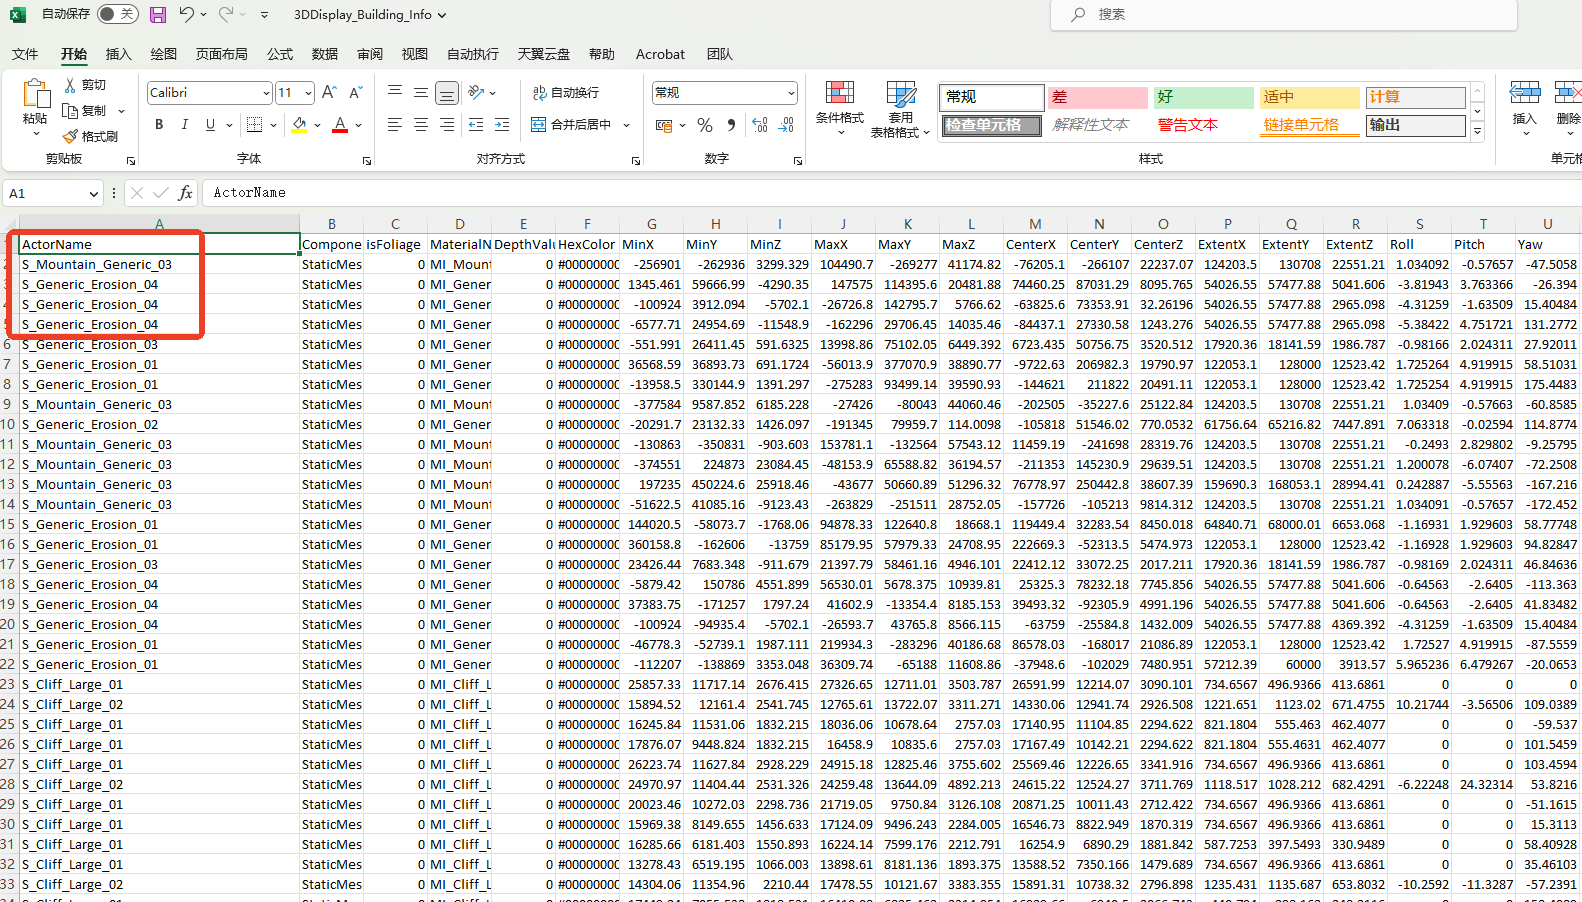
RflyGetBuildingInfo 2 0
Retrieves information for all StaticMesh-type objects in the scene without drawing bounding boxes.
Switch to the imported map, press ~ to open the console, and input RflyGetBuildingInfo 2 1. Then, locate the [level_name]_Building_Info table in the PX4PSP\RflySimUE5\RflySim3D directory, which records all actor names.
RflyLoad3DFile
RflyLoad3DFile(FString FileName) (Execute TXT Script)
Loads and executes a TXT script file from the specified path.
| Parameter | Explanation |
|---|---|
| FileName | Path to the file to be loaded |
Operation Example
For instance, create a Test.txt file on the D drive, input console commands line by line, then launch RflySim3D and enter the console command:
RflyLoad3DFile "C:\foo.txt"
RflyMoveVehiclePosAng
RflyMoveVehiclePosAng(int CopterID, int isFitGround, float x, float y, float z, float roll, float pitch, float yaw) (Offset Vehicle Position and Orientation)
Applies a positional and angular offset to a specified drone. isFitGround determines whether the drone’s altitude adapts to the terrain.
| Parameter | Explanation |
|---|---|
| CopterID | Drone ID used to specify which drone to apply the offset to |
| isFitGround | Whether to adjust the drone’s z-coordinate according to terrain height. Set to 1 to adapt to terrain; 0 to keep the z-coordinate unchanged |
| x | Offset component along the x-axis. Moves the drone a specified distance along the x-axis in 3D space |
| y | Offset component along the y-axis. Moves the drone a specified distance along the y-axis in 3D space |
| z | Offset component along the z-axis. Moves the drone a specified distance along the z-axis in 3D space |
| roll | Euler angle component. Rotates the drone around its local x-axis by the specified angle |
| pitch | Euler angle component. Rotates the drone around its local y-axis by the specified angle |
| yaw | Euler angle component. Rotates the drone around its local z-axis by the specified angle |
Operation Example
RflyMoveVehiclePosAng 1000 1 -10 -10 -10 0 -20 0
Moves the drone by (-10, -10, -10) meters and sets its pitch angle to -20°. If isFitGround is set to 1, the drone’s z-coordinate will be adjusted based on the terrain height.
RflyReqObjData
RflyReqObjData(int opFlag, FString objName, FString colorStr) (Request Specific Object Data)
Requests data for a specific object in the RflySim3D scene. This function is similar to the RflyReqVehicleData function in that it also retrieves data for objects in the 3D scene; however, it retrieves data for only one specified object at a time.
| Parameter | Explanation |
|---|---|
| opFlag | Operation flag, used to specify the type of data to be returned |
| objName | Object name or camera ID, used to specify the target object or camera from which to retrieve data. For camera data, specify the camera ID; for object data, specify the object name |
| colorStr | Color string, optional parameter, used to specify the color of the data |
| opFlag | Description |
|---|---|
| 0 | Returns camera (Camera) data for the specified ID. |
| 1 | Returns copter (Copter) data for the specified ID. |
| 2 | Returns object (Object) data for the specified name. |
| 20 | Clears all cameras. |
| 21 | Clears all copters. |
| 22 | Clears all objects. |
| 23 | Clears all copters and objects. |
| 24 | Clears all cameras, objects, and copters. |
| 10 | Deletes one camera. |
| 11 | Deletes one copter. |
| 12 | Deletes one object. |
When opFlag is 0, the function returns camera data for the specified ID (objName=seqID) used for image capture. The camera data structure is as follows:
struct CameraData {
int checksum = 0; // Checksum, constant 1234567891
int SeqID; // Camera sequence number
int TypeID; // Camera type
int DataHeight; // Image pixel height
int DataWidth; // Image pixel width
float CameraFOV; // Camera field of view
float PosUE[3]; // Camera center position
float angEuler[3]; // Camera Euler angles
double timestmp; // Timestamp
};
When opFlag is 1, the function returns copter data for the specified ID (objName=CopterID). The copter data structure is as follows:
struct CoptReqData {
int checksum = 0; // Checksum, constant 1234567891
int CopterID; // Copter ID
float PosUE[3]; // Copter center position (specified during manual 3D modeling; attitude coordinate axis, not necessarily at geometric center)
float angEuler[3]; // Copter Euler angles
float boxOrigin[3]; // Object geometric center coordinates
float BoxExtent[3]; // Half of the object’s bounding box dimensions (width, height, depth)
double timestmp; // Timestamp
};
When opFlag is 2, the function returns object data for the specified ID (objName= seqID/ ObjName[32]). The object data structure is as follows:
struct ObjReqData {
int checksum = 0; // Checksum, constant 1234567891
int seqID = 0;
float PosUE[3]; // Object center position (specified during manual 3D modeling; attitude coordinate axis, not necessarily at geometric center)
float angEuler[3]; // Object Euler angles
float boxOrigin[3]; // Object geometric center coordinates
float BoxExtent[3]; // Half of the object’s bounding box dimensions (width, height, depth)
double timestmp; // Timestamp
char ObjName[32] = { 0 }; // Object name
};
Operation Examples
When opFlag==0, the function can create a camera for image capture based on the request, and the camera data can be retrieved using this function:
RflyReqObjData 0 0 FFFFFF
When opFlag==1, open RflySim3D, double-click the ground while pressing the letter 'O' followed by the number '3' to create a copter with ID (default 1000), then input the command:
RflyReqObjData 1 1000 FFFFFF
When opFlag==2, in RflySim3D, not all objects belong to the Copter class (e.g., terrain, obstacles, buildings, etc.). This interface can be used to retrieve information about non-Copter objects. Open RflySim3D and double-click the ground. Upon clicking, some information is output on the screen; the first word indicates the name of the hit object, meaning “the terrain name is Landscape_1”.
Then use the command:
RflyReqObjData 2 Landscape_1 FFFFFF
to query information about the object named “Landscape_1”.
RflyReqVehicleData
RflyReqVehicleData(FString isEnable) (Activate Data Feedback)
Activates the data feedback mode. In this mode, whenever RflySim3D receives updated copter data, it retransmits the relevant data.
| Parameter | Explanation |
|---|---|
| isEnable | 0 indicates deactivation of data feedback mode; 1 indicates activation of data feedback mode |
By default, RflySim3D only receives copter information from external sources, and the received UDP data follows a structure similar to the following struct:
struct SOut2SimulatorSimple {
int checkSum;
int copterID;
int vehicleType;
float MotorRPMSMean;
float PosE[3];
float AngEuler[3];
}
| Member Variable | Explanation |
|---|---|
| checkSum | Integer variable representing |
| Parameter | Explanation |
|---|---|
| xLeftBottom, yLeftBottom | Coordinates of the terrain’s bottom-left corner, in meters. Specifies the starting position for terrain scanning. |
| xRightTop, yRightTop | Coordinates of the terrain’s top-right corner, in meters. Specifies the ending position for terrain scanning. |
| scanHeight | Maximum terrain height limit, in meters. This parameter defines the height range for generating the heightmap and text file. |
| scanInterval | Sampling interval for scanning, in meters. This parameter determines the resolution of terrain sampling, i.e., the distance between sampling points. |
Operation Example
RflyScanTerrainH(-1000, -1000, 1000, 1000, 200, 1)
This command specifies the terrain’s bottom-left corner at (-1000, -1000) meters and top-right corner at (1000, 1000) meters. The maximum terrain height is limited to 200 meters. Sampling occurs every 1 meter. After executing this command, RflySim3D will scan the specified terrain area and generate a heightmap PNG image file and a corresponding text (TXT) file. These two files with identical names can be found under the path “\PX4PSP\RflySim3D”.
RflySetActuatorPWMs
RflySetActuatorPWMs(int CopterID, float pwm1, float pwm2, float pwm3, float pwm4, float pwm5, float pwm6, float pwm7, float pwm8) (Trigger Blueprint Interface; Available Only in Personal Premium Edition and Above)
Passes 8 values and triggers the blueprint interface function of the target drone.
| Parameter | Explanation |
|---|---|
| CopterID | Drone ID used to specify which drone’s motor data should be set. |
| pwm1, pwm2, pwm3, pwm4, pwm5, pwm6, pwm7, pwm8 | Eight motor control values. These values control the rotation speed or other behaviors of the drone’s rotors or actuators. Their specific meanings depend on the settings of the corresponding blueprint model. |
Operation Example
Assume you have created a drone with ID 1000 in RflySim3D and want to start rotating its propellers, with the first four motors set to a speed of 10 units per second:
RflySetActuatorPWMs(1000, 10, 10, 10, 10, 0, 0, 0, 0)
RflySetActuatorPWMsExt
RflySetActuatorPWMsExt(int CopterID, float pwm9, float pwm10, float pwm11, float pwm12, float pwm13, float pwm14, float pwm15, float pwm16, float pwm17, float pwm18, float pwm19, float pwm20, float pwm21, float pwm22, float pwm23, float pwm24) (Trigger Extended Blueprint Interface; Available Only in Personal Premium Edition and Above)
Passes 16 values and triggers the blueprint interface function of the target drone.
| Parameter | Explanation |
|---|---|
| CopterID | Drone ID used to specify the target drone whose blueprint interface function should be invoked. |
| pwm9 - pwm24 | 16 parameters passed as data to the target drone’s blueprint interface function. Their specific meanings and effects depend on the design of the target drone’s blueprint. |
Operation Example
RflySetActuatorPWMsExt(1000, 10, 10, 10, 10, 0, 0, 0, 0, 0, 0, 0, 0, 0, 0, 0, 0)
Note
This function requires the full version of RflySim and the target drone must be an instance of a custom blueprint class. These 16 dimensions of data are directly passed to the "ActuatorInputsExt" function within the target drone’s blueprint class, and RflySim3D does not process them by default.By calling the "RflySetActuatorPWMsExt" function, you can transmit various control data to the target drone’s blueprint, enabling diverse control effects. This function provides more parameters, allowing for flexible control and interaction.
RflySetCopterLine
RflySetCopterLine(int CopterID, FString colorStr) (Define Trajectory Color)
Passes 8 values and triggers the interface function of the target drone’s blueprint.
| Parameter | Explanation |
|---|---|
| CopterID | The drone’s ID, used to specify the vehicle whose trajectory color is to be set. |
| colorStr | Sets the trajectory color of the target aircraft using a hexadecimal color code in the format #RRGGBB. Here, RR denotes the red component (range: 00 to FF), GG denotes the green component (range: 00 to FF), and BB denotes the blue component (range: 00 to FF). Each color component supports 256 possible values, yielding a total of 256×256×256 = 16,777,216 possible color combinations. |
Operation Example
Assume you have created a drone with ID 1 in RflySim3D and wish to set its trajectory color to red. You can enter the following command:
RflySetCopterLine(1, "FF0000"); subsequently, press the T key in RflySim3D to display the trajectory.
Primary Colors
Red: RflySetCopterLine(CopterID, "FF0000")
Green: RflySetCopterLine(CopterID, "00FF00")
Blue: RflySetCopterLine(CopterID, "0000FF")
Yellow: RflySetCopterLine(CopterID, "FFFF00")
Cyan: RflySetCopterLine(CopterID, "00FFFF")
Purple: RflySetCopterLine(CopterID, "FF00FF")
White: RflySetCopterLine(CopterID, "FFFFFF")
Black: RflySetCopterLine(CopterID, "000000")
Gradient Colors Between Primary Colors
Intermediate gradient colors between these primary colors can be achieved by adjusting the RGB hexadecimal values. Below are the transition color codes between each pair:
- Red (FF0000) and Yellow (FFFF00)
Only the green component needs to be increased from00toFF.
| Color Name | Hex Code | Example Code |
|---|---|---|
| Red | FF0000 | RflySetCopterLine(CopterID, "FF0000") |
| Orange | FF7F00 | RflySetCopterLine(CopterID, "FF7F00") |
| Yellow | FFFF00 | RflySetCopterLine(CopterID, "FFFF00") |
- Yellow (FFFF00) and Green (00FF00)
The red component must be decreased fromFFto00.
| Color Name | Hex Code | Example Code |
|---|---|---|
| Yellow | FFFF00 | RflySetCopterLine(CopterID, "FFFF00") |
| Yellow-Green | 7FFF00 | RflySetCopterLine(CopterID, "7FFF00") |
| Green | 00FF00 | RflySetCopterLine(CopterID, "00FF00") |
- Green (00FF00) and Cyan (00FFFF)
The blue component must be increased from00toFF.
| Color Name | Hex Code | Example Code |
|---|---|---|
| Green | 00FF00 | RflySetCopterLine(CopterID, "00FF00") |
| Blue-Green | 00FF7F | RflySetCopterLine(CopterID, "00FF7F") |
| Cyan | 00FFFF | RflySetCopterLine(CopterID, "00FFFF") |
- Cyan (00FFFF) and Blue (0000FF)
The green component must be decreased fromFFto00.
| Color Name | Hex Code | Example Code |
|---|---|---|
| Cyan | 00FFFF | RflySetCopterLine(CopterID, "00FFFF") |
| Light Blue |
| Parameter | Explanation |
|---|---|
| CopterID | The ID of the Copter whose ID position content is to be set |
| Text | The text content to display at the ID position |
| colorStr | The text color. Can be specified using a string representing a hex color value, e.g., "FF0000" for red, "00FF00" for green |
| size | The size or scale of the text |
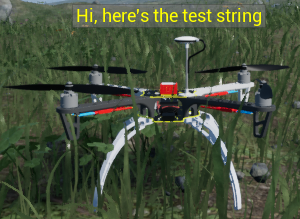
Operation Example
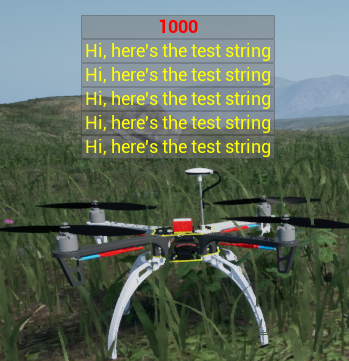
RflySetIDLabel 1000 "Hi, here's the test string" FFFF00 20
Modifies the content, color, and font size of the label on the Copter with ID 1000. This color is an RGB hex code: FFFF00 indicates red and green components at 255, and blue at 0, resulting in yellow when combined. The effect is as follows:
RflySetMsgLabel
RflySetMsgLabel(int CopterID, FString Text, FString colorStr, float size, float time, int flag) (Set Message Display below CopterID Label)
Sets the content displayed for the Message label beneath a Copter’s ID label.
| Parameter | Explanation |
|---|---|
| CopterID | The ID of the Copter whose message display content is to be set |
| Text | The text content to display in the message area |
| colorStr | The text color. Can be specified using a string representing a hex color value, e.g., "FF0000" for red, "00FF00" for green |
| size | The size of the text |
| time | The display duration of the text in seconds. After the specified time, the message disappears |
| flag | The message line index to operate on. There are 5 message labels in total. When flag ≠ 0, a new message line is added |
Operation Example
RflySetMsgLabel 1000 "Hi, here's the test string" FFFF00 20 5 -1
Displays a yellow text string below the ID label. By using the RflySetMsgLabel function, you can configure the message display content for a Copter. By specifying different parameters, you can create multi-line messages, each displayed for a specified duration before disappearing. By setting different flag values (ranging from -5 to -1 or 1 to 5), you can update or add messages on different lines. Including the original ID label, up to 6 lines can be displayed.
Setting flag to 0 directly modifies the ID label, achieving the same effect as [RflySetIDLabel].
RflySetMsgLabel 1000 "Hi, here's the test string" FFFF00 20 5 0
RflySetPosScale
RflySetPosScale(float scale) (Global Scaling)
Applies global scaling to position coordinates.
| Parameter | Explanation |
|---|---|
| scale | Position scaling factor |
This function affects the position information of Copters received by RflySim3D via UDP, with the default scale == 1.
The structure received by RflySim3D is as follows:
struct SOut2SimulatorSimple {
int checkSum;
int copterID;
int vehicleType;
float MotorRPMSMean;
float PosE[3]; // An array of 3 float variables representing the aircraft’s position; the three elements correspond to the X, Y, and Z coordinates, respectively.
float AngEuler[3];
}
After receiving position information, RflySim3D performs an additional processing step: "PosE[i] = PosE[i] * scale", applying a global scaling transformation.
Operation Example
RflySetPosScale 100
This function is primarily used to unify units. In RflySim3D, spatial units are in centimeters (cm). If the incoming data uses meters (m) as the unit, this command can be used so that no additional unit conversion logic is required.
RflySetVehiclePosAng
RflySetVehiclePosAng(int CopterID, int isFitGround, float x, float y, float z, float roll, float pitch, float yaw) (Reset Copter)
Sets the position and orientation (attitude) of a drone.
| Parameter | Explanation |
|---|---|
| CopterID | The drone’s ID, used to specify which drone’s position and orientation are to be set. |
| isFitGround | Whether to adjust the drone’s altitude to match terrain height. If set to 1, the drone’s Z coordinate will be adjusted according to terrain height; if set to 0, the Z coordinate remains unchanged. |
| x | X-axis component of the position. |
| y | Y-axis component of the position. |
| z | Z-axis component of the position. |
| roll | Euler angle component of rotation: rotation angle around the drone’s X-axis. |
| pitch | Euler angle component of rotation: rotation angle around the drone’s Y-axis. |
| yaw | Euler angle component of rotation: rotation angle around the drone’s Z-axis. |
Operation Example
Suppose you want to directly set the drone with ID 1000 to position (-10, -10, -10) meters and set its pitch angle to -20°. You can use the following command:
RflySetVehiclePosAng(1000, 1, -10, -10, -10, 0, -20, 0)
RflyShowTextTime
RflyShowTextTime(String txt, float time) (Display Text)
Displays the text txt in UE for time seconds.
| Parameter | Explanation |
|---|---|
| txt | The text to be displayed. |
| time | Display duration, in seconds. |
Operation Example
RflyShowTextTime hello,world 5
If the text to display contains spaces:
RflyShowTextTime "hello world" 5
You can directly send the text to display via the Python interface sendRflyShowTextTime.
If sending via the Python interface sendUE4Cmd, the command string should be formatted as: 'RflyShowTextTime "txt" time'
foliage.MaxTrianglesToRender
foliage.MaxTrianglesToRender (Foliage Model Triangle Count)
The triangle count limit for rendering foliage-type models (Foliage Triangles to Render) refers to the maximum number of triangles allowed when rendering foliage models in the simulation scene.
| Parameter | Explanation |
|---|---|
| Triangle Count | Sets the maximum number of triangles allowed for foliage models. |
Operation Example
The following command sets the foliage model triangle count to the minimum (0):
foliage.MaxTrianglesToRender 0
r.ForceLOD
r.ForceLOD (LOD Polygon Count)
Changes the Level of Detail (LOD) settings for the scene, reducing polygon count. LOD is a technique used to manage rendering detail by using models and textures of varying complexity depending on distance and camera angle, balancing performance and visual quality.
| Parameter | Explanation |
|---|---|
| LOD Level | The LOD level to force-apply. Typically specified as an integer from 0 (highest detail level) up to the maximum LOD level. |
Note
In complex scenes, modifying LOD settings may cause changes in the display of terrain or other objects.
Operation Examples
Forcing all LODs to 0 sets all objects to the highest LOD level, effectively disabling LOD. This means objects will always be rendered at the highest detail level, regardless of their distance or camera angle.
r.ForceLOD 0
Similarly, setting LOD to -1 disables LOD for all objects, causing them to be rendered at the lowest detail level.
r.ForceLOD -1
r.MipMapLODBias
r.MipMapLODBias (MipMap LOD Bias)
Adjusts the MipMap LOD bias for textures. MipMap is a pre-rendering technique used to provide textures at varying levels of detail.
| Parameter | Explanation |
|---|---|
| LOD Bias Value | Represents the MipMap LOD bias for textures. A higher LOD Bias value indicates the use of lower-resolution MipMap levels, reducing the displayed texture detail. |
Operation Example
The following example sets the MipMap LOD bias for textures to 2:
r.MipMapLODBias 2
r.PostProcessAAQuality
r.PostProcessAAQuality (Post-Processing Anti-Aliasing Quality)
Controls the quality level of post-processing anti-aliasing effects.
| Parameter | Explanation |
| Parameter | Explanation |
|---|---|
| Resolution Percentage | Specifies the resolution percentage. Typically represented as integer values, e.g., 100 for native resolution, 50 for half the native resolution, and 200 for double the native resolution. |
Operation Example
Set the rendering resolution to 75% of the native resolution:
r.ScreenPercentage 75
r.SetNearClipPlane
r.SetNearClipPlane (Viewport Near Clip Plane)
Sets the camera’s near clip plane.
| Parameter | Explanation |
|---|---|
| Near Clip Plane Distance | Specified in camera-space units, typically centimeters. |
Operation Example
The following example sets the near clip plane to 10 units:
r.SetNearClipPlane 10
r.ShadowQuality
r.ShadowQuality (Shadow Quality)
Controls the quality level of shadows.
| Parameter | Explanation |
|---|---|
| Quality Level | Specifies the shadow quality level. |
| Quality Level | Explanation |
|---|---|
| 0 | No shadows |
| 1 | Low-quality shadows |
| 2 | Medium-quality shadows |
| 3 | High-quality shadows |
Operation Example
Disabling shadows: Completely disables shadows in the game to improve performance.
r.ShadowQuality 0
r.Streaming.PoolSize
r.Streaming.PoolSize
Sets the size of the texture streaming pool. The texture streaming pool is a memory pool used for dynamically loading and unloading texture resources to optimize performance and resource management.
| Parameter | Explanation |
|---|---|
| Pool Size | Specifies the size of the texture streaming pool, in MB. |
Note
The default allocation is 1 GB of VRAM. If unsure how to configure it, use zero:r.Streaming.PoolSize 0. Modify this setting when the message "TEXTURE STREAMING POOL OVER ***MiB BUDGET" appears in the top-left corner of the screen. Such a warning indicates that some textures are loading at lower LODs, resulting in a blurry image.
Operation Example (Modifying the texture streaming pool size)
Setting the streaming pool size to 4096 MB:
r.Streaming.PoolSize 4096MB
r.setRes
r.setRes (Set Display Resolution)
Sets the game’s display resolution.
| Parameter | Explanation |
|---|---|
| [Width]x[Height] | Resolution parameter: specifies the game’s display resolution. For example, 1280x720 means a width of 1280 pixels and a height of 720 pixels. |
| [Fullscreen/Windowed] | Display mode parameter: Fullscreen or Windowed, specifying the game’s display mode. |
Note
The actual supported resolutions and display modes depend on the graphics card, monitor, and RflySim3D configuration.
Operation Examples
r.setRes 1920x1080 Fullscreen
In this example, the resolution is set to 1920x1080 in fullscreen mode.
r.setRes 1280x720 Windowed
In this example, the resolution is set to 1280x720 in windowed mode.
sg.PostProcessQuality
sg.PostProcessQuality (Post-Processing Quality)
Post-processing refers to image processing applied after scene rendering, enabling adjustments such as color correction, blurring, and lighting effects to enhance visual quality.
| Parameter | Explanation |
|---|---|
| Quality Level | Determines the detail level and computational complexity of post-processing effects. |
Operation Example
The following example sets the post-processing quality level to the minimum (level 0):
sg.PostProcessQuality 0
sg.TextureQuality
sg.TextureQuality (Texture Quality)
The texture quality level determines texture resolution and detail, affecting both visual fidelity and performance.
| Parameter | Explanation |
|---|---|
| Texture Quality Level | Specifies the texture quality level. |
Operation Example
The following example sets the texture quality level to the minimum (level 0):
sg.TextureQuality 0
slomo
slomo (Modify Running Speed)
Adjust the running speed to accelerate or decelerate the application.
| Parameter | Explanation |
|---|---|
| slomo | Running speed value: specifies the playback speed. The default value is 1, representing normal speed. Smaller values slow down the speed, while larger values speed it up. |
Operation Examples
slomo 0.5
In the above example, the running speed is set to half of the normal speed.
slomo 2
In the above example, the running speed is set to twice the normal speed.
stat Engine
stat Engine (Display Frame Rate, Time, Triangle Count, etc.)
Displays engine-related statistics in RflySim3D. Using this command enables real-time monitoring of engine performance and other related information.
| Parameter | Explanation |
|---|---|
| None | This command is solely used to display engine statistics and requires no additional parameters. |
Operation Example
stat Engine
In the above example, engine-related statistics display is enabled. RflySim3D will show statistics including frame rate, time, triangle count, texture memory usage, and physics simulation metrics, among others.
stat fps
stat fps (Display Update Rate)
Enables real-time monitoring of the simulation program’s frame rate performance.
| Parameter | Explanation |
|---|---|
| None | This command is solely used to display frame rate information and requires no additional parameters. |
Operation Example
stat fps
In the above example, frame rate display is enabled. RflySim3D will show the current frame rate information; entering the command again will hide the frame rate display.
stat game
stat game (Display Tick Feedback Time for Each Process)
Displays program logic and performance statistics in RflySim3D. Using this command enables real-time monitoring of RflySim3D’s logical operations and performance.
| Parameter | Explanation |
|---|---|
| None | This command is solely used to display RflySim3D logic and performance statistics and requires no additional parameters. |
Operation Example
stat game
In the above example, RflySim3D logic and performance statistics display is enabled. RflySim3D will show statistics such as RflySim3D logic frame rate, update time, and rendering time.
stat gpu
stat gpu (Display GPU Frame Statistics)
Displays GPU (graphics card) performance statistics in RflySim3D. Using this command enables real-time monitoring of GPU performance within RflySim3D.
| Parameter | Explanation |
|---|---|
| None | This command is solely used to display GPU performance statistics and requires no additional parameters. |
Operation Example
stat gpu
In the above example, GPU performance statistics display is enabled. RflySim3D will show statistics such as GPU utilization, rendering time, and GPU memory usage.
stat rhi
stat rhi (Display GPU Consumption Details)
Displays Render Hardware Interface (RHI) performance statistics in RflySim3D. Using this command enables real-time monitoring of the performance of the rendering interface used by RflySim3D.
| Parameter | Explanation |
|---|---|
| None | This command is solely used to display RHI performance statistics and requires no additional parameters. |
Operation Example
stat rhi
In the above example, RHI performance statistics display is enabled. RflySim3D will show RHI performance data, such as rendered frame count, GPU utilization, and GPU memory usage.
stat scenerendering
stat scenerendering (Display Draw Calls)
Displays Draw Calls in RflySim3D. Using this command enables real-time monitoring of scene rendering performance and other related information.
| Parameter | Explanation |
|---|---|
| None | This command is solely used to display scene rendering statistics and requires no additional parameters. |
Operation Example
stat scenerendering
In the above example, scene rendering statistics display is enabled. RflySim3D will show statistics including Draw Calls, rendered frame count, triangle count, rendering time, object count, lighting calculations, and shadow calculations, among others.
stat unit
stat unit (Display Various Consumption Metrics)
Displays performance statistics in RflySim3D. Using this command enables real-time monitoring of performance across various systems, such as CPU, GPU, and rendering time.
| Parameter | Explanation |
|---|---|
| None | This command is solely used to display performance statistics and requires no additional parameters. |
Operation Example
stat unit
In the above example, performance statistics display is enabled. RflySim3D will show performance metrics such as CPU usage, GPU usage, and rendering time.
t.Maxfps
t.Maxfps (Limit Frame Rate)
Controls the simulation program’s performance by setting a maximum frame rate.
| Parameter | Explanation |
|---|---|
| Maxfps | Maximum frame rate |
Operation Examples
t.Maxfps 60 In the above example, the maximum frame rate is set to 60 FPS.
t.MaxFPS 30 In the above example, the maximum frame rate is set to 30 FPS.