3.3 Frequently Asked Questions
3.3.1 When running the RflySim platform for the first time, RflySim3D cannot start or crashes immediately after launch. What is the cause and how to resolve it?
Answer:
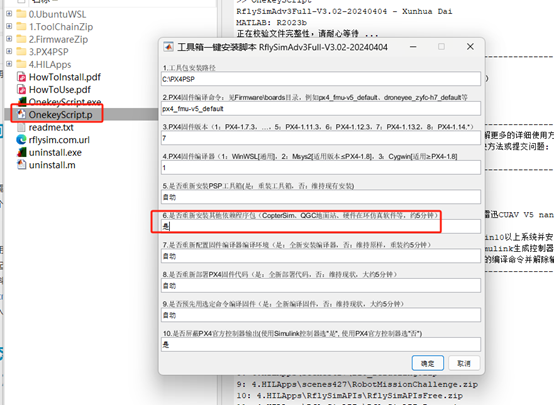
- Try reinstalling RflySim3D: Open the RflySim platform software installation package, run the OneKeyScript file, and select option 6 in the one-click installation script to reinstall RflySim3D.
- Check whether the PC graphics driver is up to date. You can update it using one of the following methods:
Method 1: Manually Update via Device Manager
- Open Device Manager: Right-click on "This PC", select "Properties", then click "Device Manager".
- Locate Display Adapters: In Device Manager, expand the "Display Adapters" category.
- Update Driver: Right-click on your NVIDIA graphics card and select "Update driver". Choose "Search automatically for drivers" and Windows will search for and download the latest driver.
- Install and Restart: If a new driver is found, follow the prompts to install it. The screen may flicker briefly during installation. Restart your computer after installation.
Method 2: Download from NVIDIA's Website
- Visit NVIDIA's driver page: https://www.nvidia.cn/geforce/drivers/
- Select your GPU series, model, and operating system, then click "Search".
- Download and install the latest driver from the search results.
Method 3: Use Third-Party Driver Update Software
- Download driver update software (e.g., Driver Booster). These programs automatically scan for missing or outdated drivers.
- Run a scan and update the recommended drivers.
3.3.2 During SIL simulation, the M key in RflySim3D can only switch scene maps within a single scene and cannot switch maps while CopterSim is running. How to switch scenes?
Answer:
RflySim3D's M key cannot switch maps while CopterSim is open. You can only change the UE4_MAP value in the BAT script, as shown below:
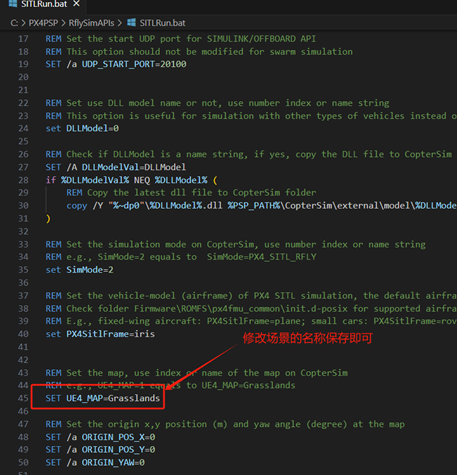
Tip: To freely switch scenes in RflySim3D, open RflySim3D separately (without CopterSim) and press "M" to cycle through available scenes.
3.3.3 How to add weather and sunshine effects to the RflySim3D scene? How are these effects reflected in the UE project?
Answer:
Adding weather and sunlight effects to RflySim3D may require custom work, as these features are not built-in like they are in UE4. General approaches:
Adding weather effects:
- Particle system: Use RflySim3D's particle system to simulate rain, snow, etc. Adjust shape, size, and speed parameters.
- Material changes: Adjust materials to simulate fog, wind, etc. For example, change ground material transparency for a fog effect.
- Custom scripts: For complex effects, write scripts that change particle effects and materials based on time-of-day and weather conditions.
Adding sunshine effects:
- Lighting settings: Add and adjust light sources to simulate sunlight. Vary the angle and intensity for different times of day.
- Dynamic skybox: Use a dynamic skybox/sky sphere for realistic sunrise/sunset effects.
- Global illumination: Adjust global illumination settings for light propagation and reflection.
Reflecting in UE4 project:
- Export scene: Export elements (models, materials, lighting) from RflySim3D to a format suitable for UE4 (e.g., FBX).
- Import to UE4: Import the exported scene. Adjust scaling as needed.
- Set weather/sunshine: Use UE4's built-in weather system or third-party plugins. Ensure light source positions and intensities match the RflySim3D settings.
3.3.4 How to generate an underwater scene in RflySim3D?
Answer:
Generating underwater scenes in RflySim3D requires special settings:
- Choose a suitable scene: Select a scene containing a body of water (lake, ocean, underwater cave).
- Set up the underwater environment: In the scene editor, add water bodies and adjust properties (color, transparency, waves) to achieve a realistic underwater effect.
- Adjust vehicle parameters: For underwater vehicles, modify buoyancy, thrust, and control response parameters to suit the underwater environment.
- Test and optimize: Conduct tests and optimize until the underwater vehicle performs well in the simulated environment.
3.3.5 When using the Cesium component, the scene is blank after adding the item to the UE level (possibly due to poor network). How to resolve this?
Answer:
Several potential solutions:
- Wait for loading: If network connectivity is poor, the Cesium component may take a long time to load. Ensure a stable connection and wait patiently.
- Check resource links: Verify that terrain data, image data, and 3D models are properly linked in your project.
- Check configuration parameters: Ensure the geographic coordinate system, terrain resolution, and image resolution are set correctly.
- Check logs: Review UnrealEngine logs for loading errors.
- Optimize load performance: Reduce geographic data/model resolution or use cascade loading techniques.
- Update component version: Try updating to the latest Cesium component version.
Additionally, you can use a local URL (absolute path), an Nginx proxy, or a CesiumLab-sliced URL to replace remote image/elevation data. A meta.json file must exist in the same directory as the .json or .xml file — without it, image and elevation data cannot be loaded. This file contains essential data such as latitude and longitude.
3.3.6 When merging multiple images using Cesium, white edges appear around the images. How to resolve this?
Answer:
Possible solutions:
- Preprocess image data: Before merging, ensure image borders are transparent (not white). Use image editing software (Photoshop, GIMP) or image processing libraries (OpenCV, Pillow).
- Adjust merge algorithm parameters: If using Cesium's merge tools, try adjusting overlay mode and transparency settings.
- Manual repair: Use image editing software to manually remove white edges from the merged result.
- Border smoothing techniques: Apply image filters or boundary smoothing algorithms for more natural transitions.
- Align projections and coordinate systems: Ensure all image data uses the same projection and coordinate system before merging.
3.3.7 Can the RflySim3D flight trajectory color be customized?
Answer:
Flight trajectory color modification in RflySim3D is still under development and is not supported at this time.
3.3.8 Can the project under px4\RflySim\RflySim3D be opened directly with UE?
Answer:
RflySim3D itself does not support secondary development. You can use the pre-packaged models or scenes (or your own packaged ones) and import them into the software for simulation.
3.3.9 Is the terrain in RflySim3D a real map or just a virtual map (aircraft cannot land on terrain)?
Answer:
It is a virtual map.
3.3.10 Why does the aircraft encounter an invisible wall and fail to land on the ground?
Answer:
Because the RflySim3D scene is a virtual scene without physical ground collision.
3.3.11 How to modify the left and right axes to be coaxial on a hexacopter platform model?
Answer:
Create an Animation Blueprint in UE to control the axis logic. If unfamiliar, search the UE Marketplace for reference models, download one into your project, and study how the Animation Blueprint is structured. (Right-click on the skeletal mesh → Create Animation Blueprint.)
3.3.12 The aircraft model exported from UE4 appears very small, and is invisible when imported into RflySim3D. How to fix this?
Answer:
If the model appears too small after import, adjust the scale factor during UE import, or set the correct unit when exporting from your 3D modeling software. For example, 3ds Max defaults to decimeters — you need to manually change the system unit to centimeters (cm).
3.3.13 When preparing a 3D MAX model for Animation Blueprints, should only the propellers be controlled (without the motors)? Is the motor grouped under the body system?
Answer:
Only keep the bone nodes that you need to control in the animation.
3.3.14 Materials were not imported successfully. How to resolve this?
Answer:
There is a material reference issue. In UE, click on the material error to view it — the error message provides the material path. Update the material path reference accordingly.
3.3.15 For adding a servo-based tilting structure to the arm, is it better to use a Blueprint model or 3D MAX with a custom UAV import?
Answer:
In 3ds Max, bind the bone structure of the model (or create groups based on module parent-child relationships). Export as FBX, select "Skeletal Mesh" when importing to UE, and control bone rotation in the Animation Blueprint to achieve tilting. Alternatively, export as a static mesh and use XML nodes for attachment (this approach is more complex).
3.3.16 Does the new model aircraft not support SolidWorks (SW) import?
Answer:
Export from SolidWorks to a format supported by 3ds Max (e.g., STEP, IGES), then process in 3ds Max. Most common 3D model formats can eventually be imported into UE.
3.3.17 What software is the 3D simulation engine based on?
Answer:
RflySim3D is developed based on Unreal Engine 4 and features high-fidelity simulation. Users can design custom simulation scenarios and import them. RflySimUE5, based on Unreal Engine 5, offers better visual quality but requires higher hardware performance and is currently only available in the full version.
3.3.18 Can the 3D engine connect to FlightGear?
Answer:
FlightGear is included in the RflySim Toolchain installation package and can be used after installation. However, due to its relatively lower visual quality, RflySim3D is recommended instead.
For more questions, please visit: https://github.com/RflySim/Docs/issues